在Web应用开发中,静态资源(如CSS、JavaScript、图片等)是构成用户界面的重要组成部分。本教程将指导您如何为Express应用准备静态资源,包括创建public文件夹、下载Bootstrap框架和Bootstrap Icons图标库,并创建一个示例主页。
public文件夹的准备
在Express应用中,静态资源通常存放在一个专门的目录中,这个目录被称为"public"文件夹。Express提供了一个内置的中间件express.static 来处理静态文件。
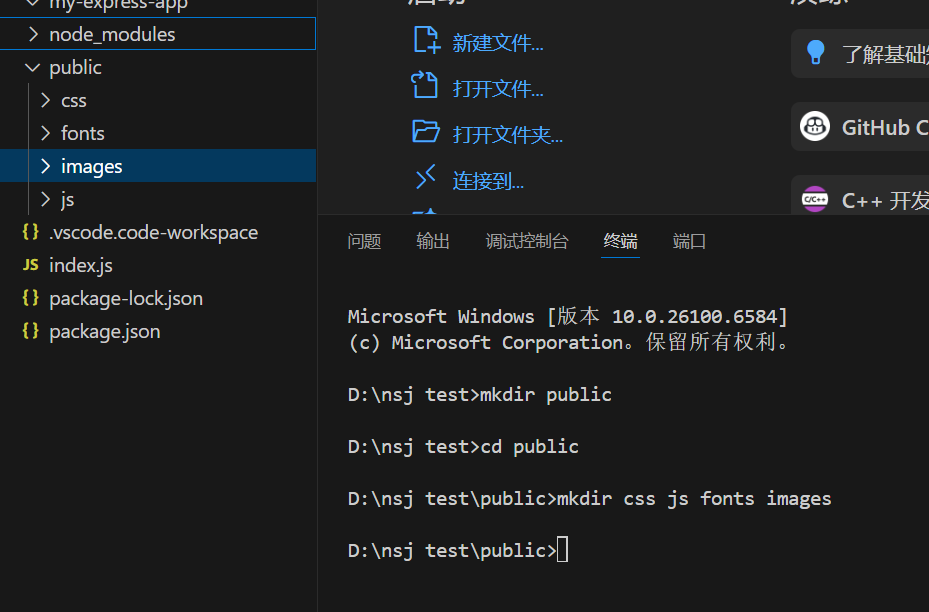
创建public目录结构
首先,在项目根目录下创建public文件夹及相关子目录:
1
2
3
4
5
public/ ├── css/ ├── js/ ├── fonts/ └── images/
在命令行中执行以下命令创建目录结构:
1
2
3
4
mkdir publiccd publicmkdir css js fonts imagescd ..
配置Express以提供静态文件
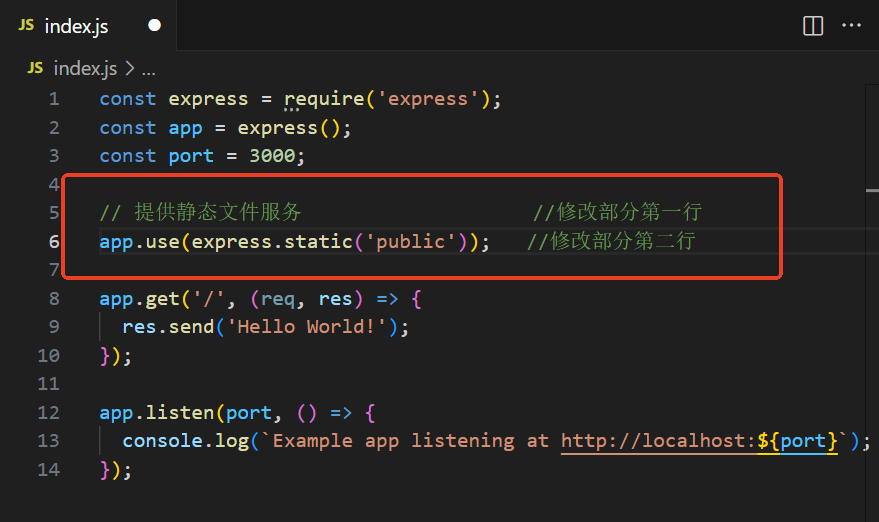
要在Express应用中提供静态文件,需要使用express.static中间件。修改您的index.js文件:
1
2
3
4
5
6
7
8
9
10
11
12
13
14
const express = require ('express' );const app = express ();const port = 3000 ;app.use (express.static ('public' )); app.get ('/' , (req, res ) => { res.send ('Hello World!' ); }); app.listen (port, () => { console .log (`Example app listening at http://localhost:${port} ` ); });
代码解释:
app.use(express.static('public')):告诉Express将public目录下的文件作为静态资源提供当用户访问http://localhost:3000/css/style.css时,Express会自动查找并返回public/css/style.css文件
Bootstrap源文件下载
Bootstrap是最流行的前端框架之一,提供了响应式布局、预定义样式和丰富的UI组件[1]。
下载Bootstrap
访问Bootstrap官方网站:https://getbootstrap.com
点击"Download"按钮
选择"Download source"选项下载源码包
解压下载的压缩包
安装Bootstrap到项目中
将Bootstrap的CSS和JavaScript文件复制到相应的目录:
将bootstrap-x.x.x/dist/css/bootstrap.min.css复制到public/css/目录
将bootstrap-x.x.x/dist/js/bootstrap.bundle.min.js复制到public/js/目录
您也可以通过npm安装Bootstrap:
然后从node_modules/bootstrap/dist/目录复制相应文件到public目录。
在HTML中使用Bootstrap
创建一个简单的HTML文件来测试Bootstrap是否正常工作。将以下内容保存为public/index.html文件,这样可以直接通过访问http://localhost:3000/来查看页面效果:
1
2
3
4
5
6
7
8
9
10
11
12
13
14
15
16
<!DOCTYPE html > <html lang ="zh-CN" > <head > <meta charset ="UTF-8" > <meta name ="viewport" content ="width=device-width, initial-scale=1.0" > <title > Bootstrap Test</title > <link rel ="stylesheet" href ="/css/bootstrap.min.css" > </head > <body > <div class ="container" > <h1 > Hello, Bootstrap!</h1 > <button class ="btn btn-primary" > Primary Button</button > </div > <script src ="/js/bootstrap.bundle.min.js" > </script > </body > </html >
Bootstrap Icons文件的下载
Bootstrap Icons是Bootstrap官方提供的开源SVG图标库,包含超过1,800个图标[2]。
下载Bootstrap Icons
访问Bootstrap Icons官网:https://icons.getbootstrap.com
点击"Download"按钮下载最新版本
解压下载的压缩包
Bootstrap Icons文件结构
解压后的Bootstrap Icons包含以下重要文件:
bootstrap-icons.css:CSS样式文件fonts/:包含字体文件(如.woff、.woff2等)bootstrap-icons.svg:SVG精灵图文件
安装Bootstrap Icons到项目中
将bootstrap-icons.css文件复制到public/css/目录
将fonts/文件夹中的所有文件复制到public/fonts/目录
Bootstrap Icons的工作原理
Bootstrap Icons使用Web字体技术来显示图标:
**WOFF (Web Open Font Format) **:现代浏览器广泛支持的字体格式
WOFF2 :WOFF的改进版本,具有更好的压缩率CSS文件定义了每个图标的类名,通过:before伪元素显示对应字符
在CSS文件中,你会看到类似这样的定义:
1
2
3
4
5
6
7
8
9
10
11
12
13
14
15
16
17
18
19
@font-face { font-display : block; font-family : "bootstrap-icons" ; src : url ("./fonts/bootstrap-icons.woff2?8d200481aa7f02a2d63a331fc782cfaf" ) format ("woff2" ), url ("./fonts/bootstrap-icons.woff?8d200481aa7f02a2d63a331fc782cfaf" ) format ("woff" ); } .bi ::before { display : inline-block; font-family : bootstrap-icons !important ; font-style : normal; font-weight : normal !important ; font-variant : normal; text-transform : none; line-height : 1 ; vertical-align : -.125em ; -webkit-font-smoothing : antialiased; -moz-osx-font-smoothing : grayscale; }
在HTML中使用Bootstrap Icons
在HTML文件的<head>部分引入Bootstrap Icons CSS文件:
1 <link rel ="stylesheet" href ="/css/bootstrap-icons.css" >
然后可以在任何元素上使用图标类:
1 2 3 <i class ="bi bi-heart-fill" > </i > <i class ="bi bi-star" > </i > <i class ="bi bi-check-circle" > </i >
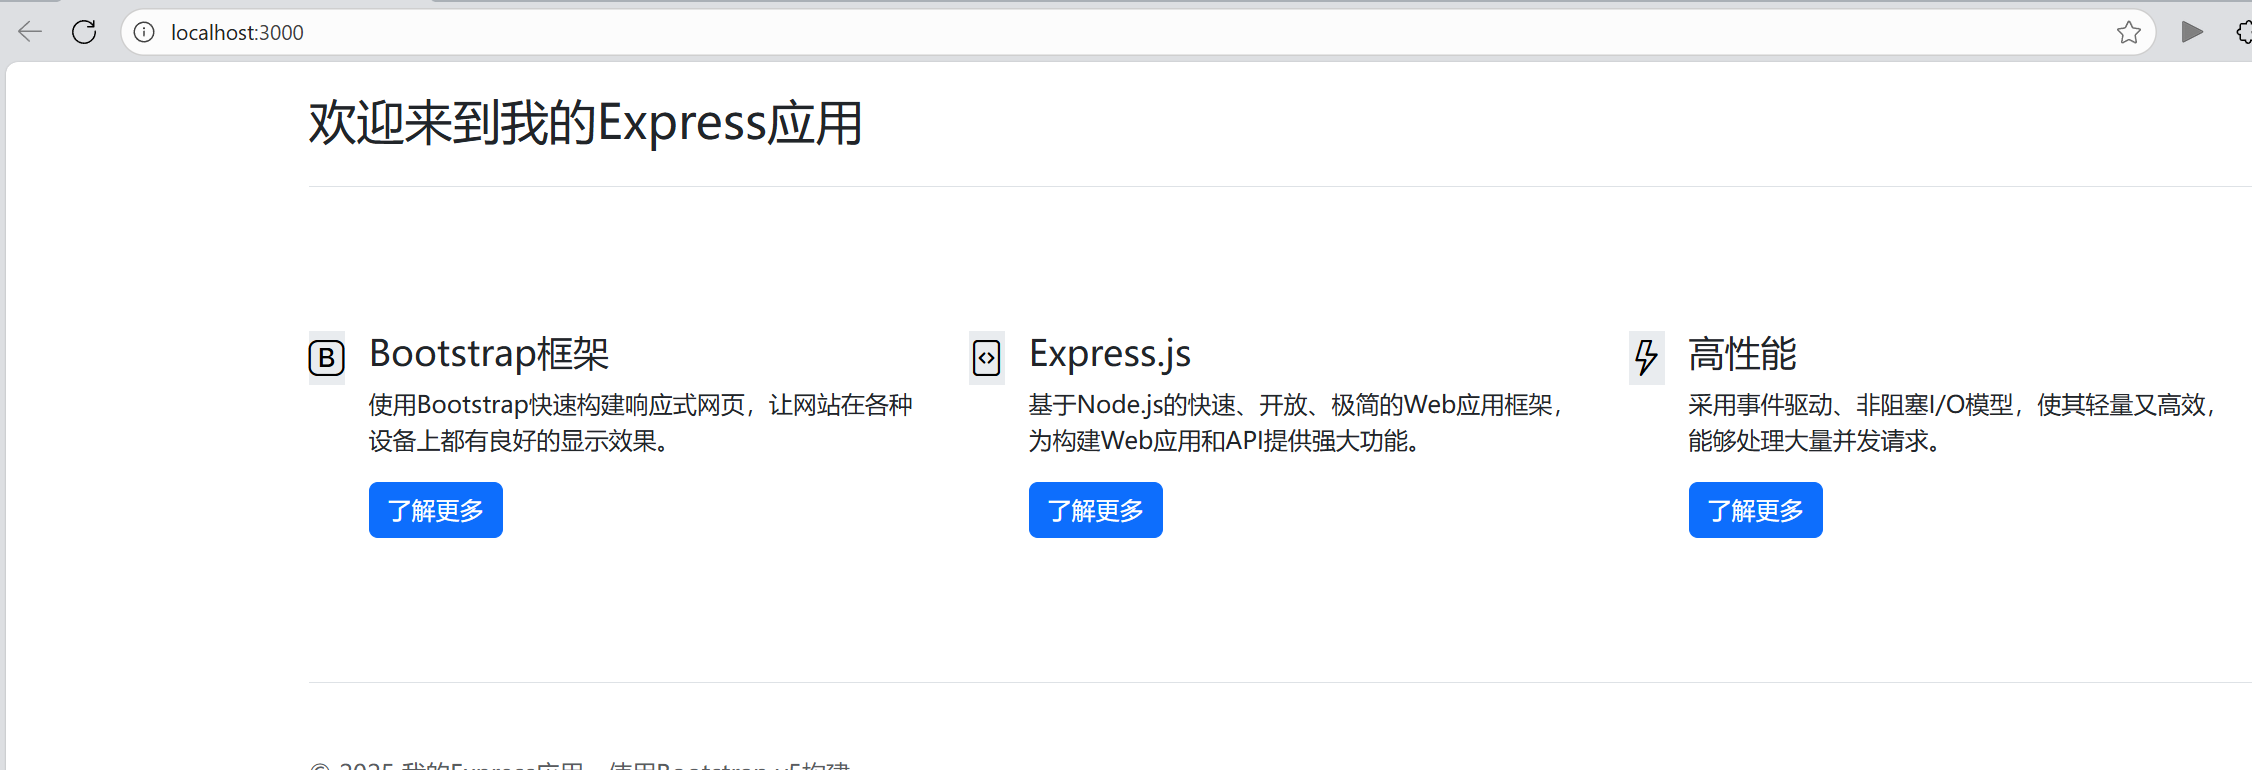
主页面(示例页面)的编写
现在让我们创建一个完整的示例主页,展示如何整合所有静态资源。
创建主页文件
在public/目录下创建一个index.html文件:
1
2
3
4
5
6
7
8
9
10
11
12
13
14
15
16
17
18
19
20
21
22
23
24
25
26
27
28
29
30
31
32
33
34
35
36
37
38
39
40
41
42
43
44
45
46
47
48
49
50
51
52
53
54
55
56
57
58
59
60
61
62
63
64
65
66
67
68
69
70
71
72
73
74
75
76
<!DOCTYPE html > <html lang ="zh-CN" > <head > <meta charset ="UTF-8" > <meta name ="viewport" content ="width=device-width, initial-scale=1.0" > <title > 我的Express应用</title > <link rel ="stylesheet" href ="/css/bootstrap.min.css" > <link rel ="stylesheet" href ="/css/bootstrap-icons.css" > <style > body { padding-top : 20px ; } .feature-icon { width : 4rem ; height : 4rem ; border-radius : .75rem ; } </style > </head > <body > <div class ="container" > <header class ="d-flex align-items-center pb-3 mb-5 border-bottom" > <h1 class ="h2" > 欢迎来到我的Express应用</h1 > </header > <div class ="row g-4 py-5 row-cols-1 row-cols-lg-3" > <div class ="col d-flex align-items-start" > <div class ="icon-square text-body-emphasis bg-body-secondary d-inline-flex align-items-center justify-content-center fs-4 flex-shrink-0 me-3" > <i class ="bi bi-bootstrap" > </i > </div > <div > <h3 class ="fs-4" > Bootstrap框架</h3 > <p > 使用Bootstrap快速构建响应式网页,让网站在各种设备上都有良好的显示效果。</p > <a href ="#" class ="btn btn-primary" > 了解更多 </a > </div > </div > <div class ="col d-flex align-items-start" > <div class ="icon-square text-body-emphasis bg-body-secondary d-inline-flex align-items-center justify-content-center fs-4 flex-shrink-0 me-3" > <i class ="bi bi-file-code" > </i > </div > <div > <h3 class ="fs-4" > Express.js</h3 > <p > 基于Node.js的快速、开放、极简的Web应用框架,为构建Web应用和API提供强大功能。</p > <a href ="#" class ="btn btn-primary" > 了解更多 </a > </div > </div > <div class ="col d-flex align-items-start" > <div class ="icon-square text-body-emphasis bg-body-secondary d-inline-flex align-items-center justify-content-center fs-4 flex-shrink-0 me-3" > <i class ="bi bi-lightning" > </i > </div > <div > <h3 class ="fs-4" > 高性能</h3 > <p > 采用事件驱动、非阻塞I/O模型,使其轻量又高效,能够处理大量并发请求。</p > <a href ="#" class ="btn btn-primary" > 了解更多 </a > </div > </div > </div > <footer class ="pt-5 my-5 text-body-secondary border-top" > © 2025 我的Express应用 - 使用Bootstrap v5构建 </footer > </div > <script src ="/js/bootstrap.bundle.min.js" > </script > </body > </html >
更新Express路由
为了让用户访问根路径时能看到我们设计的主页,我们需要显式地处理根路径请求。虽然将index.html文件放在public目录下也能通过http://localhost:3000/访问到,但通过路由处理可以给我们带来更多的控制权:
明确的控制 :我们可以决定在什么条件下返回哪个文件动态处理 :可以根据请求参数或其他条件返回不同的内容错误处理 :可以更好地处理文件不存在等异常情况SEO友好 :可以更容易地实现服务器端渲染等优化措施
修改index.js文件:
1
2
3
4
5
6
7
8
9
10
11
12
13
14
15
16
const express = require ('express' );const path = require ('path' );const app = express ();const port = 3000 ;app.use (express.static ('public' )); app.get ('/' , (req, res ) => { res.sendFile (path.join (__dirname, 'public' , 'index.html' )); }); app.listen (port, () => { console .log (`Example app listening at http://localhost:${port} ` ); });
测试主页面
确保所有文件都已正确放置在相应目录中
启动Express应用:
打开浏览器访问http://localhost:3000
您应该能看到一个使用Bootstrap样式和Bootstrap Icons的精美主页
注意:即使不添加路由处理代码,直接将index.html放在public目录下也能通过http://localhost:3000/访问到该文件,因为Express的static中间件会自动处理对根路径的请求并返回public目录下的index.html文件。但我们添加显式的路由处理是为了获得更精确的控制和扩展性。
静态资源配置的最佳实践
目录组织 :合理组织静态资源目录结构,便于维护和查找文件命名 :使用有意义的文件名,避免特殊字符版本控制 :对于第三方库,保留版本信息以便追踪性能优化 :使用压缩版本的CSS和JavaScript文件缓存策略 :合理设置静态资源的缓存策略以提高加载速度
总结
通过本教程,我们学习了如何:
创建和配置public文件夹来存放静态资源
下载和安装Bootstrap框架
下载和配置Bootstrap Icons图标库,理解其工作原理
编写一个综合示例页面,整合所有静态资源
配置Express应用以正确提供静态文件服务
这些步骤为构建现代化的Web应用界面奠定了基础,使您的应用具有专业的外观和良好的用户体验。
参考文献
[1] Bootstrap, “Bootstrap · The most popular HTML, CSS, and JS library in the world.,” 2023. [Online]. Available: https://getbootstrap.com/ . [Accessed: Oct. 30, 2025].
[2] Bootstrap Icons, “Bootstrap Icons · Official open source SVG icon library for Bootstrap.,” 2023. [Online]. Available: https://icons.getbootstrap.com/ . [Accessed: Oct. 30, 2025].